 Newbie Central - Making a map Newbie Central - Making a map
As with any new place (for a place is what MUD2 is, fundamentally), you need to start off by getting your bearings. So you explore, find some landmarks and discover ways to return to these landmarks for if you wander off. This will give you an idea of the character of the place and some impression of its size and layout. But what if you come across something interesting and want to find it again some time later?
This issue's topic is maps.
There comes a time when all newbies realise that they're just going to have to make a map.
Although you can get along quite well without a map if you have a good idea of the lay of The Land, there comes a stage when you realise that if you're ever going to make sense of the whole thing, a map is what you need. Sure, clicking the swamp and out buttons (the zw and o commands) can get you back from most places when you're lost, but they can't stop you from getting lost when you try find those places again. You don't really want to make a map, because you know it's going to be tiresome, but if you want to take the game seriously, you'll have to.
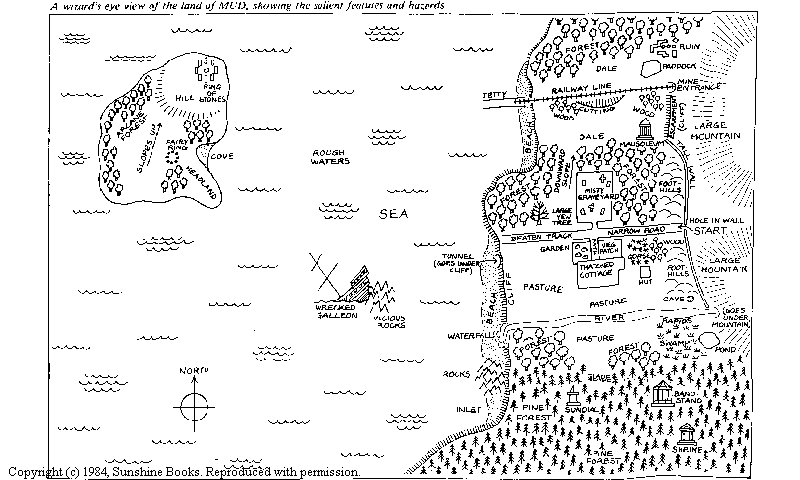
But hold on, if everyone needs a map, why should everyone have to make their own? Why aren't accurate, up-to-date maps available online that you can just download and print off on your top-notch laserprinter? Well the pedantic answer is that some maps are available online, but of course they're not the ones you actually want. That's because maps serve two purposes: to educate and to inform. You really need two types of map, one for each purpose. The ones you see scattered across the various web sites devoted to MUD2 are of the "inform" variety: they tell you what the general geography is so that you can get your bearings, but they don't go into detail. They're often more like a bird's eye view of The Land (which is what MUD2's world is called) than the kind of abstract, representational map which you might make to stop you from getting lost. So although you can see on these what the main features of the game world are and you can relate where you are to where things of interest might be, you never really know more than the vague direction you ought to be headed if you want to get somewhere.
Inform-style maps are good for rank newbies, but they're not good for people trying to break out of newbieland and into the mainstream. For these people, the educate-style maps are necessary. So why aren't any of those on the web? Well several reasons come to mind:
None of these is the proper reason, though. The thing is, when you make a map you learn so much more about the game than how its rooms interconnect. Sure, you do find out-of-the-way rooms in places you might not otherwise have visited, which may contain treasure or kit, or be useful as a place to hide or sleep. But while mapping you pay attention to things you didn't even think of before, like what objects start where, which keys fit which doors, where mobiles wander and why - in short, you learn the game's structure. That's why I said that the job of these maps is to educate: they teach you about the game by forcing you to think about it. Maps are a way of making people take notes. If detailed maps were available on the web, or if MUD2's client software had an auto-map facility, then you'd miss out on that and, in the long term, be doing yourself more harm than good. That's why the wizzes don't look too kindly on maps which are too detailed, no matter how good the intentions of the people who made them. You're doing yourself a disservice if you use them.
OK, enough philosophy! You want to make maps, right? :-)
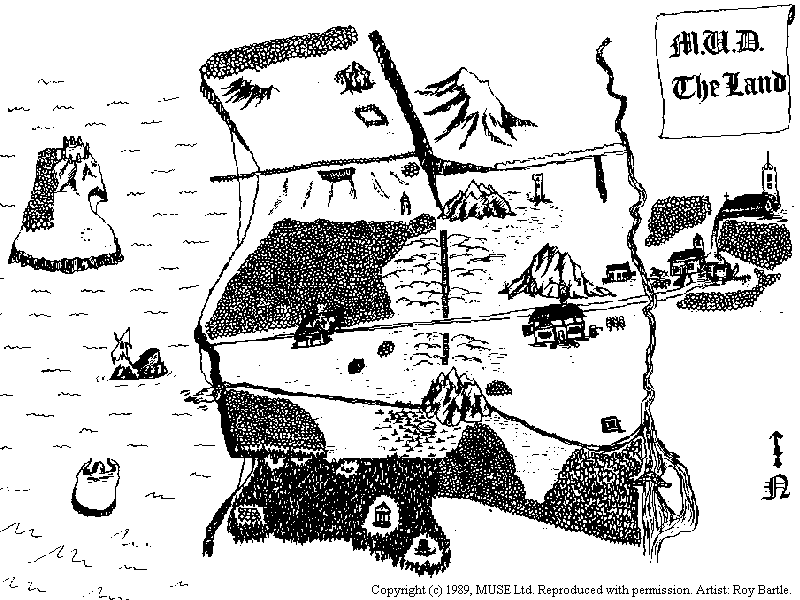
You don't need to make your own overview-style map, because there are plenty around that other people have made already - there's even one inside the game itself. However, that doesn't mean you shouldn't know what they look like: you must have at least some idea of how The Land breaks down into areas before you start mapping, which means you need to be able to visualise it beforehand. Overview maps help you do that.
Here is a selection of links to overview maps of The Land:
For the purposes of discussing overview maps, I'll look at the map that's available within the game itself. It's actually a set of instructions for drawing an overview map, rather than an ASCII picture or anything, but they're easy enough to follow. The map is usually to be found in the study in the cottage. If we construct it, we get something like this:
|
Now although this can hardly be called "detailed", it does a reasonably job of telling you what the main areas are and how they're positioned relative to each other. OK, there are some minor anomalies, but you get the general picture. What's more, because you have to draw the map yourself from instructions, you can't help but actually read all the area names and become more familiar with them than if you just printed the map off of a website. In this respect, it has some educational content, too. Aren't these games designers cunning? :-)
From this overview map, we can see that there are a number of areas in The Land. Hmm, I keep using that word "areas", I guess I should say what I mean by it :-) . As luck would have it, there's already a definition that the game itself gives with the defn area command. This is what it says:
| area | ||
| noun A collection of rooms with a common theme, setting or puzzle element. Several areas make up a section. Commonly referred-to areas in The Land are: (for MUD1 rooms) the Cottage, the Pine Forest, South of the Road, North of the Road, the Mine, the Dwarf Realm, the Sea, the Ship (or the Galleon), the Dragon Isle, Under the Yew Tree, Behind the PC, the Goblin Lair, the Foothills, the Graveyard, the Cave, the Swamp, the Isle of Woe; (for Valley) the Inn, the Evil Wood, the North Mountain, the Middle Mountain, the South Mountain, Under the Inn; (for Simon's rooms) the Olives, "Il Castellare", the Monastery, the Scriptorium, the (Formal) Gardens (also known as the Park), the Keep. There are two small, disconnected areas: the Sancta and the GFC. Other areas are modular add-ons not present in every incarnation of the game, eg. the North Mountain and Oriental Temple (also known as the Pagoda, although strictly speaking that's just the multi-storey building at its focal point). Commonly-run blank complexes can take on the status of areas, too. |
So, essentially, an area is a group of geographically proximate rooms sharing some conceptual similarity (for example an impassable border). Overview maps just show you the areas; detailed maps show you the rooms. When you make a detailed map, you make it an area at a time. I suggest you use the tried-and-trusted areas that other people have made maps used for their overview maps, but you don't have to. If you visualise the rooms near the great gate as a natural block (river bank, sheltered path, bonsai garden, belfry, fen and so on) then it's fine to use that as an area for mapping purposes if you feel more comfortable with it.
When to map? I did most of mine in and after mobile bashes, when there are no creatures there to make life difficult! There are PKs around, of course, but if all you want to do is map then I seriously recommend your using a protected persona (PP). To get one of these, type vow in the Tearoom: your character will then be protected from attacks by other characters. You can't make wiz with a PP, but who cares if all you want to do is map with it?
What to map? Well some areas need mapping more than others, because it's easy to get lost or miss rooms in them. Your progress through mazes is benefited by maps, obviously, but it's also a good idea for places where you might find yourself without light (the mine), where you may be blocked and not know where you finish (the dwarf realm), where there are lots of similar rooms close together (the oriental temple - where do those apes hide?!!), where you don't get to visit very often (the giants) and where one false move will kill you (the sea - most important!). But start with something easy, to get your technique right. While there is a lot of leeway in drawing overview maps (witness the differences between the maps mentioned above, detailed maps are something else. Making them is not a trivial exercise.
Although MUD2 is apparently designed with 2-dimensional polygons to represent rooms, you can't seriously map that way. Maybe afterwards you can overlay room borders, but while you're doing it you're basically restricted to rooms and lines. The rooms are connected to one another by lines which correspond to the various possible directions you can move.
The cardinal rule of MUD2 mapping is: links aren't necessarily bidirectional. This is the cause of much pain and sorrow, but also of some of the fun; it can be quite satisfying, in a perverse kind of way, to find a configuration which makes some kind of geographic sense.
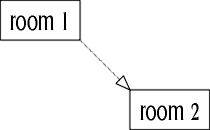
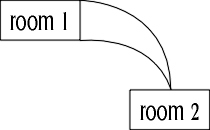
Fortunately, although not all links are bidirectional, enough are to be able to use for a map. If you stick to using such bidirectional links, ignoring most of the others, you get a much cleaner and usable map. So long as you distinguish between the lines (using arrows on lines for unidirectional connections and arrowless or two-headed arrows for bidirectional ones) you should be able to get something you can follow easily. As usual, use what you feel most comfy with.
So what we have so far (we'll embellish this, don't worry) is something like the following:
 |
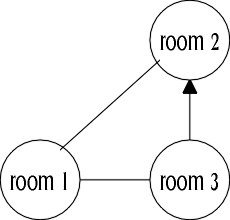
I've put the rooms in boxes, because that makes it easier to draw lines off of them. It seems a popular way to do it. Circles are good, too:
 |
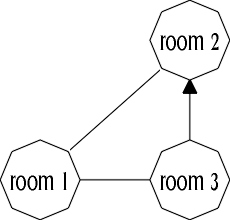
or octagons if you want to be really serious about it:
 |
I'll stay with rectangles, though :-) .
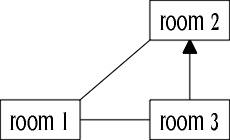
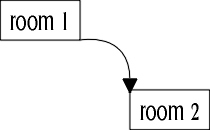
Now we come across our first problem. If we use this representation, where a vertical line up from a room means "north" and a horizontal line to the right means east"" and so on, we get a very intuitive map but it only allows for 8 directions. MUD2 has 14 directions, the extra ones being: in, out, up, down, jump, swamp. How can we accommodate those?
Well, we don't actually have to accommodate them most of the time, since they usually correspond with some compass direction. Almost every room has an out direction that matches one (or more!) of the 8 compass directions. You can mark these if you want, or just not bother. Here are some possibilities (for out):
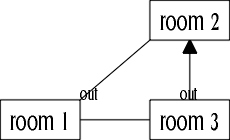 |
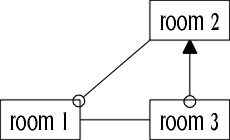 |
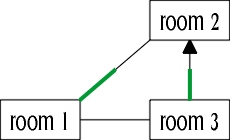 |
The one in colour seems the best, because you can use several colours, each meaning different things (green for out, red for in, blue for swamp and so on) and you can use double colours. But in practice, you get lots of colour and not a lot of meaning:
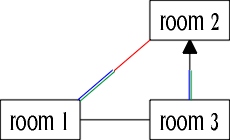 |
For in, out and swamp, you can do what you like really. Personally, I miss them off all together. The other three non-compass directions are another matter, though. For these, you really can't get away with re-using existing lines. For example, you can't get to the beach from the cliff using any direction other than jump, so jump needs to be represented somehow. As with out, the options are to colour the line or somehow label it, but you can also change the shape or form of the line (because it's not shared with any other directions). Here are some suggestions (for jump):
 |
 |
 |
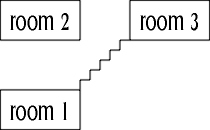
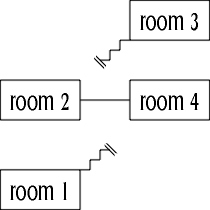
With up and down, there is usually a corresponding compass direction. The problem is, they can often lead to part of the map that you've already used, because they're in 3D. If you've drawn everything roughly proportional (although proportions don't really matter too much with representational maps like these) then you may find that going north up some stairs means you have to place a room where one is placed already. In the game, this second room would be below the first one, but on 2D maps it can't be. For example, although it's topologically possible to draw all four floors of the Inn as a 2D network using only compass directions, what you end up with doesn't really work as a map. You could try drawing in 3D, but isometric projections of networks are hard to read directions off of. A better solution is to use the up/down steps as like a break to another part of the map, as in these examples:
 |
 |
 |
Having developed a notation for the rooms and their connections, you're now in a position to consider what else you might want to add to your map to make it useful. I've found that it's useful (at least when you're learning) to know: what objects block movement in certain directions (such as doors and the rain); what rooms you need to have a boat to enter (such as sea rooms); what objects and mobiles typically start off in particular rooms.
For the obstacles, I make a mark on the affected line (which is OK to do as these things work bidirectionally). For doors, the mark I actually make when mapping is to do with what key will open it, but since that's a bit beyond newbie level you can just use some symbol or other, for example
for doors and
for swollen rivers.
I suppose for boat rooms you could mark the lines, too, but I prefer to mark the rooms themselves. You can do this in a number of ways, such as colouring the box or changing its shape or giving it a mark:
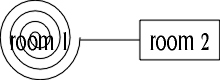 |
I find that colouring works very well here - it's a lot more effective than colouring lines is for out and stuff, and it gives you a nice picture of where the sea is. To be honest, though, you probably don't need it unless you're doing composite maps of several areas; after all, if every room is sea, you kind of know everywhere is going to be a need-a-boat kind of room :-) . Colour is also useful for marking "landmark" rooms like the swamp, so you can find where they are relative to you quite easily. Do the swamp in red, so you know not to blow yourself up with a stick in it :-) .
Lists of contents of rooms are another place where colour-coding may help when you're in a hurry and are looking for something - anything! - of a particular type. I always write in the names of the objects so I know what they are, in this order:
If something often starts in a particular location but doesn't always, I put a question mark after its name to remind me. I use an ampersand and indentation to show when objects are inside (or carried by) other objects (or mobiles). I used to write any special notes I had in green but these quickly cluttered the maps up, so now I keep them separately.
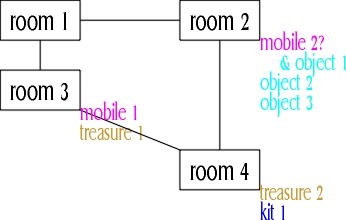 |
Again, remember that these are just suggestions. If you don't want to mark objects on your map, don't! It's what's useful for you that's important - you're not making maps for anyone else. They're personal.
OK, I've gone over the theory, now for the practice. How do you actually go about getting those rooms and connections in the first place? The game does provide a rudimentary map command, but frankly it's useless. The exits command is far more useful, especially in its auto exits version where it shows the exits from wherever you move to every time you move. Isn't this
|
so much better than this?
|
The output from qn (meaning quickscan) is even better, but it doesn't have an auto mode, which is a shame. It would be a boon if it did. This is what qn output looks like.
|
See what I mean? When you need to know what objects are nearby, it's just what the doctor ordered!
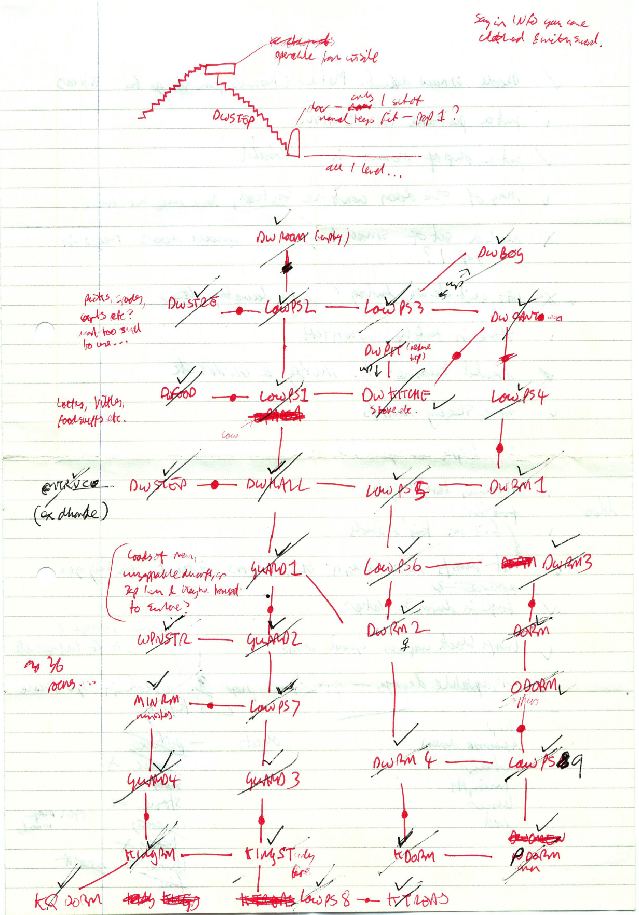
Have plenty of scrap paper handy when you start mapping - you'll need it! It doesn't have to be squared off or anything; MUD2 doesn't use a co-ordinate system, so there's no point in trying to impose one on your maps. Do everything in rough first then put it all together later when you're not playing. You will make mistakes, so use pencil and don't bother about a ruler. If you fall off of the paper, just put a number saying what sheet you're continuing on and move to that. If any area starts to look horribly messy, shift to another piece of paper and copy over the bits that are important; you can resolve mess later when you have more data.
When you start mapping an area, write down the name of the room, which is to say its short description or some shorthand thereof. Use auto exits or qn to find out what rooms are adjacent and put in tentative links to these rooms. Then put a box round the first room: this means you've "done" it. Don't worry if several directions link to the same room, you can pick the best one later. As for scale, start off with a big one - you never know when some little collection of rooms is going to appear that you'll want to be able to squeeze in. At this stage, you may have something that looks like this:
 |
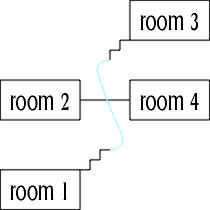
It doesn't matter about contents just yet, you can fill those in when you test out your first draft map later. Now in the above example, it looks like room 2 is north of room 1, and room 3 is probably going to be most sensible to the east. Room 4 is south or southwest and there's nothing to the west or northwest. OK, so as room 3 looks promising, maybe that would be a good one to try next. We enter room 3, see which of the three possible versions we have on the map fits the best, then draw from that. Repeat the process we did for room 1, marking any connections which are found to be bidirectional. What we end up with may look something like this:
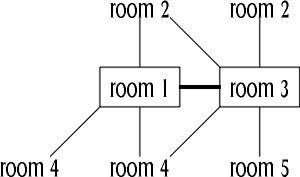 |
From here, we can see that there is a new room to the south of room 3, room 5. We can also see that room 3 connects to rooms 2 and 4. There are 2 connections to room 2, but one of those has to be unidirectional (because room 2 can't have two south exits). It looks like room 2 is north of room 1 and northwest of room 3, but we'd better check. If we did, we might get:
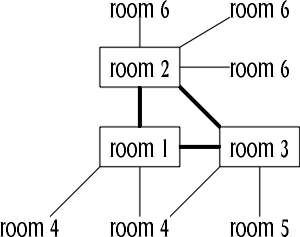 |
So room 2 was north of room 1. If it were north of room 3, then the resulting map would be like this instead:
 |
Although north from room 1 led to room 2, there was no connection between room 2 and room 1, so the north exit was unidirectional and had to be scrapped.
Although it's easy to see how you could make a mistake here (we were lucky that room 3 was east of room 1 - it might have had to be moved to northeast or southeast if the room 2 exits had come out weird) on the whole it doesn't happen very often. The main problems you get are when smaller rooms slot into a bigger "lattice" of rooms and when up and down exits play merry hell with the compass point arrangement.
Mapping is not easy, though. There are many tricks the game plays on you to make mapping harder. There are places where the connections between rooms changes every reset - or even every time they're used! There are things to trip you up and move you somewhere you're not sure where. There are mobiles to chase you away or block you. There are rooms which all look similar. But these are not insurmountable problems.
If you feel the game is thwarting your mapping efforts, you can take steps to remedy the situation. Rooms can be marked with pebbles, so you can tell whether you've been there before (unless someone moves them around for you...). Do not underestimate the fact that when you enter a room for the first time in a game you get its full description, but on subsequent occasions you get only its short description (unless you look). This is a great way to tell if you've been in a room before or not, at least when the rooms co-operate (like forests do, for example). If a mobile is being obstreperous, flee! Well hello, you were using a protected persona, what do you care if you lose some flee points? :-)
Don't forget to test your map, once you've made it. I failed to do this completely when I first mapped the scriptorium; I tested about 40 rooms, but didn't have time to do the rest and then forgot to. When I finally needed the maps, chasing after some PK to finish him off, I got totally screwed up and ended up falling into a pit and dying. So test, test, test!
Case Study
So now for an actual example of making a real map of part of MUD2. Because this article is meant for newbies, I can't make it be of somewhere you can't find. Also, I can't make it be of some place you might benefit from seeing a map of too much, or it would spoil things for you (as well as getting me into trouble with the arch-wizzes for disclosing too much information!). So I'll do a map of the cottage, a drawing of which already exists online. This way, you get to see what the place "looks like" beforehand if you've not seen it before; also, it's so easy to find that you can step through this article mapping it yourself if you want to.
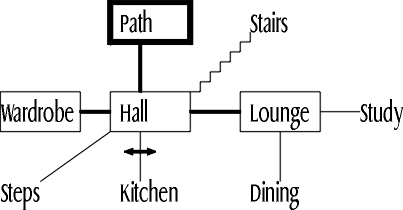
So, let's start by going south from the path into the hall. This is what exits gives us:
|
The lack of a south exit is because The kitchen door is locked shut.. If we open it, we find
|
The map we construct from this looks as follows:
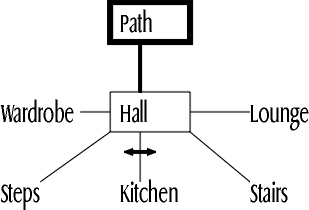 |
I put the Path in a box with thick edges to show it's part of another area (not the one we're mapping). OK, so the wardrobe looks very easy to do, we'll get that out of the way first.
|
Here's the map with this data incorporated:
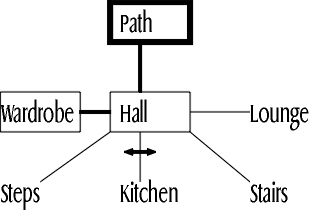 |
That was easy! Now let's try the lounge.
|
This gives us our first problem. South from the lounge is the dining area, but on the map we've made so far we have the stairs in the way. OK, well as they're stairs we can use their up connection from the hall instead of their southeast connection, then move them out of the way. I find that having steps "up" heading off in northerly directions and steps "down" heading off in southerly directions is quite intuitive, so it's not confusing (for me, that is :-) ) to have them up there.
 |
We'll tackle the dining area next, as it doesn't look problematical:
|
Although only south from the lounge leads to the dining area, there are three directions which lead back. One of these is north, though, so we can use that to make the bidirectional connection we want. For the east pasture, a similar set of three southerly connections are available. Although the east pasture isn't part of the area we're mapping, we ought to check which one of the three exits is the right one, we can't just assume it will be south. When we do exits in the east pasture, we get only two lines which relate to the dining area:
|
Oh, so we were right to check! The connection is actually southeast/northwest, not south/north. So now our map looks like this:
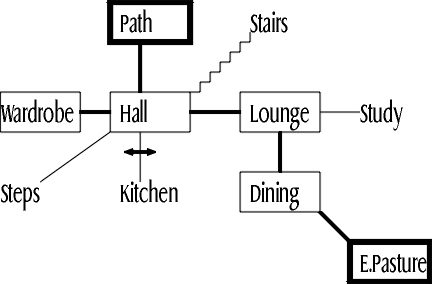 |
We'll do the study next:
|
That's a doddle, although there's a bookcase which looks like it ought to do something (and from the drawing we found can see it does!). We could try moving or destroying the bookcase, but for now we'll just make a note about it.
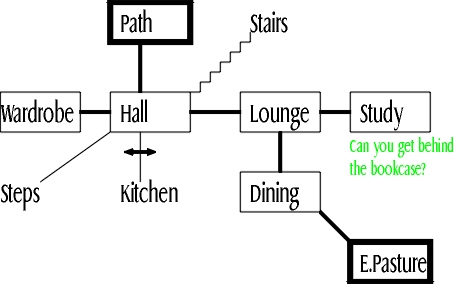 |
OK, so it looks like we should do the kitchen next.
|
Oh! We need a light! Well let's get one then.
|
That's better! Maybe we should mark on the map that the pantry is a dark room? If we just nip in for a look, we see
|
So we can add both of those to our map quite easily. Oh, but the steps to the cellar are in the way! Well that's no problem, we'll just move the kitchen a bit further south so we have room to keep them in the right place, southwest from the hall.
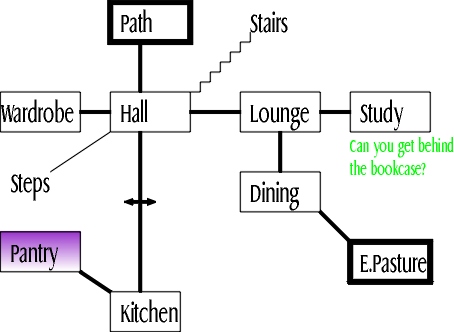 |
If we take those downward steps next, it's more of the same.
|
To balance the stairs going up from the hall, I'll change the line to the steps down to match, even though it is actually in the right compass direction (it's the aesthete in me). This gives:
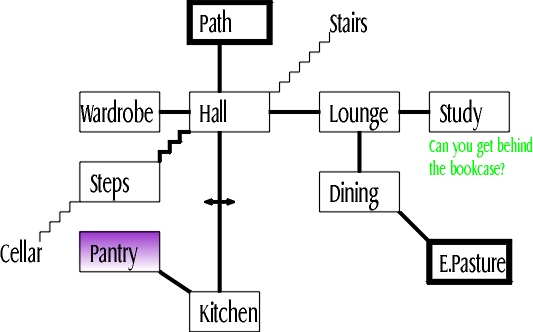 |
I think you must be getting the idea now. Continuing into the cellar, we get a door to the coal bunker in the west, am exit to a small tunnel (dark) to the south and the steps back up to the northeast. I'll put the small tunnel as the start of a separate area, but you could include them (and their destination) as part of the cottage area if you liked.
With the ground floor and basement mapped, our draft looks like this:
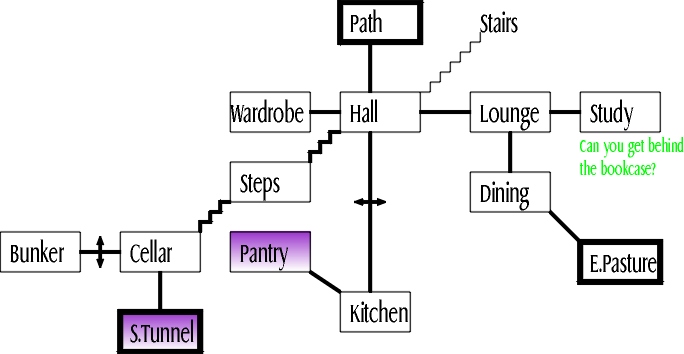 |
OK, that's probably enough to have got over the techniques involved! For completeness, the full map of the cottage is presented here (it's separate because you may decide you'd rather make your own to compare with it; besides, it's quite big - 139K!). If you do want to make your own, expect problems with the connection to the attic :-) . You may also need to move the contents of rooms around a bit to fit things together neatly.
I hope this article has been of some help to people interested in making their own maps. I also hope it hasn't put anyone off! I stress, yet again, that maps are individual to the people who make them. What I want in a map, you may not want; what I find intuitive, you may find nonsense. Do your maps how you want to do them. You're the only person who'll see them, so why worry what anyone else will think?
Remember that the game changes. I recently had to alter my overview map so it accounted for the new giants area. Although changes are rarely made to long-standing rooms, they do occasionally happen so don't forget to alter your maps when you find an anomaly. Otherwise, when you finally get around to trying the woodnymph task, you may find yourself losing valuable time figuring out how you got lost!
Further Reading
You can produce pretty maps from your eyesore originals using the tools available at the interactive fiction archive. They're meant for single-player adventure games, but they're good for MUDs too.
Exercises
Here are some exercises for you to put your mapping skills to practice with. They're in sort of easiest-first order.
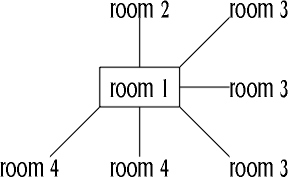
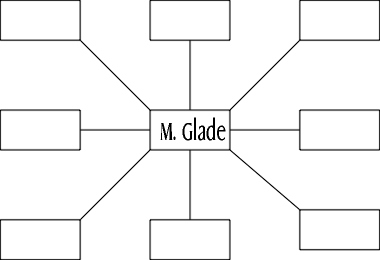 |
Fill in the blank boxes, removing those for directions that don't lead to rooms.
Monsters!
|
This Web page copyright © 2002 Viktor T. Toth
|